
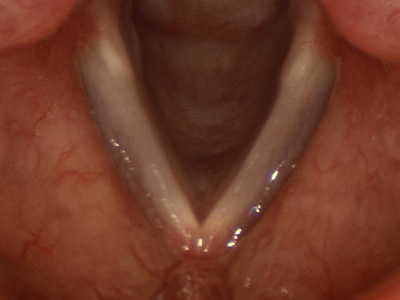
Figure 1.1: Open vocal folds during breathing
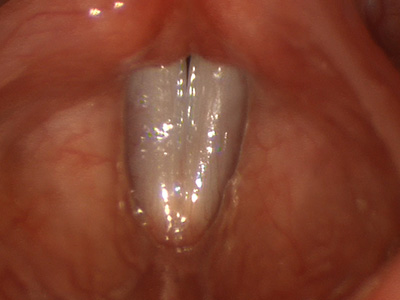
Figure 1.1: Closed vocal folds during voicing.
Voice is produced by vibration of the vocal folds. The vocal folds are a pair of pliable shelves of tissue that stretch across the top of the trachea. They are enclosed within the thyroid cartilage, which is the hard structure that forms the mass in the neck known as the Adam’s apple. The vocal folds, together with the muscles and cartilages that support them, are known as the larynx.
Biologically, the larynx evolved as a valve to protect the airway and lungs. Thus, it is positioned where the airway and the esophagus separate. The vocal folds open to allow breathing and close during swallowing to prevent food from entering into the lungs and during voicing.
Vocal fold’ is the modern term for ‘vocal cord.’ The change in terminology came about because of a better understanding of the anatomy and function of the larynx. ‘Vocal cord’ suggests a band or string suspended in the air that vibrates when it is plucked or struck. In fact, the vocal fold is a part of a muscle on the side of the larynx, covered with special tissues that can vibrate at a high speed. It resembles a lip of tissue much more than a cord. Only its outer covering vibrates.
In order to produce voice, the lungs blow air against vocal folds that are closed, but more loosely than they would be during swallowing. Air pushes through the very small space between them and in so doing, makes the covering of the vocal folds, known as the mucosa, vibrate. This occurs by means of a phenomenon known as the venturi effect. As air passes through a constriction (or venturi), it speeds up and creates a suction in its wake. This suction draws in the pliable mucosa from each vocal fold, which meets in the midline, only to be pushed aside by more air from the lungs. This cycle creates a repeating undulation which is known as the mucosal wave. The regularity of the mucosal wave is essential to the production of good voice.
——————————————————————-
Autonomous processing handout
Autonomous Processing for Singing Lessons
What is there to learn?
How will we learn it?
When? Do we need to learn something previously in order to be ready to learn it?
What will learning it gain us?
What is it’s worth?
What could stop us learning it?
What can we do to overcome this barrier?
Can we do that on our own or would someone else need to help us?
Can we use that learning in another situation/ is the learning transferable to another task/situation?
Are we able to recreate that task on our own?
What were the tools we employed?
How do these translate to any other given situation.
Retraction Handout
Outcome
In creating sustainable sound the walls of the pharynx must be under the control of the singer, should be responsive to the needs of the sound being created and independently isolated from any extraneous effort. Learning to control the pharyngeal wall allows the singer to harness the space at the back of the mouth and the top of the throat as both a resonating chamber and a filter for the sound.
Aim
To control the width, height and overall size of the pharyngeal space at the rear of the mouth.
Objective
To allow sustainable sound to resonate without tightness, over-exertion or gripping.
Exercise
Start by breathing in silently through the open mouth. Maintain the silence on both the in and out breaths. Keeping the breathing silent, start to imagine the shape of the space at the back of the mouth. Is the space small, large, high, low, wide, narrow?
Kinaesthetic and visual image – Holding the hands with the finger tips and thumb tips touching, create a circle to imitate the shape and size of the back of your mouth and the top of your throat.
Gradually increase the space at the back of the mouth by focusing on the cool breath passing through the mouth and try to hold the increased space gained on the silent in-breath through the silent out-breath. Mimic this with your hand shape.
Once the breathing has become regular in pattern (but still maintaining the cool sensation at the rear of the mouth) introduce the following and monitor how the shape at the rear of the mouth changes in shape. Mimic these with your hand shapes.
Keeping the mouth open; SMILE, FROWN, RAISE EYEBROWS, SNEER, SILENTLY LAUGH, NOW EXPAND THE FACE BY COMBINING AS MANY OF THE ABOVE ALL AT THE SAME TIME.
Hold each change on both the in and out breaths as much as you can. (The effort to hold the shape consistently on the out-breath may cause you to lose the sensation when you can’t feel the cool in-breath). Each of these additions allows you to start to control the width, height or overall volume of the space at the rear of the mouth. This in turn allows the pharyngeal wall to become firmer, to move further away from the tongue, or to expand the resonating space that any sound needs. Control of this space allows you to start to make more effort in other muscle groups without the back of the mouth and the top of the throat becoming tight, gripped or tense.
Now let’s add small sustained voiced sounds. Gradually tighten the space at the back of the mouth/top of the throat and monitor what happens to the sound. Mimic this with your hand shape. Now contrast the tight feeling by adding in each of the changes (smile, frown, eyebrow lift, sneer, silent laugh, face expansion) and listen to the change in sound. Mimic this with your hand shape. On each in-breath make sure that the breath enters silently, maintain as much space at the back of the mouth/top of the throat and try to allow the space to be filled with sound.
This expansion of the back of the mouth/top of the throat allows the pharynx to be wide and the walls to be firmly held far apart from one another. The walls are retracted (withdrawn), held firmly and securely far apart, and allow airflow to move in and out of the lung (through the larynx) silently. This sensation of space is called retraction.
——————————————————————-
Head and neck alignment, posture – Handout
Outcome
The larynx is the organ that creates sound. This sound then needs to be amplified to become louder, filtered to create any desired effect and supported to become intelligible with words. All of these additional processes can cause unwanted strain or effort. The alignment of the head and neck is the key factor in allowing this. Modern day living, sitting, driving, using computers, telephones and many of the postures habitual to these tasks involve head and neck angles that are less useful for vocal production.
Aim
In creating versatile sound production the relationship between the head, neck and shoulders should be under the control of the singer, able to respond to the physical needs of character and flexible enough to continue allowing vocal production under most postural circumstances.
Objective
The primary need when beginning vocal production is to find a neutral and supportive posture that avoids any excess tension. Once you have found this specific control tensions can be added or removed more easily at will.
Exercise
Begin by finding a neutral stance. Place the feet parallel to one another under the shoulders and pointing forward. Raise the crown of the head as far as is comfortable and monitor how tall you’ve become. Contrast this with your habitual stance. What feels different? Where are you working more? What parts of your body are engaged? Are there any tensions that you can release?
Pay attention to these particular areas;
Feet balanced equally, weight being maintained through both the heels and the ball of each foot?
When the feet are pointing forward, parallel, under the shoulders, is there any tension in the thighs, buttocks, lower back, abdomen, chest, or neck? Does moving the feet create any undue tension in any of these areas? Which? Feet further apart will cause a redistribution of effort as your body realigns and supports itself while standing. Angling your feet outwards will allow a gripping of stomach wall or back muscles which will in turn affect your airflow. Find as neutral a position as possible. Knees soft? Are they locked backwards or bent too far forward?
Once a neutral stance is maintained raise the crown of the head to elongate the back of the neck. Contrast this with the following; RAISE THE CHIN, THRUST THE CHIN FORWARD, PULL THE CHIN BACK, PULL THE CHIN DOWN. All of the above postures affect sound production. Your aim is to avoid creating sound dependant on any of these. The head and neck should be free to remain upright, elongated and flexible to respond to the physicality of the character, and not be utilised to stabilise the larynx, reach for high or low notes or extended to try to make the sound louder.
Kinaesthetic – lets combine two hand gestures that will help us visualise and find the physicality of both retraction and the alignment of the head and neck. Keeping the crown of the head high, bring your fists together in front of the top of your stomach. Press the knuckles of both of your fists together. Keep the back of your neck long. With your fists pressing into one another where do you feel your body engaging? Shoulders? Shoulder-blades? Muscles between shoulder-blades? Under arms in the torso?
With the head and neck aligned the back can access large muscle groups to help support and stabilise the work that the larynx needs to do. There are other ways to stabilise or support the larynx that seem to achieve the same goal, but will have adverse effects on the sustainability of your voice.
——————————————————————-
Repeat this and add in raising your shoulders to your ears after extending your fingertips. This engages the back of the neck.
Now just have your arms parallel to the floor at elbow height and draw your elbows straight back to the wall. Pinch the yoga mat gently with just the muscles between your shoulder blades. Try to make this pinch smaller and less effortful, then do the whole exercise agin while standing. Then again without the yoga mat.
—————————
Socratic Questioning Handout
Conceptual clarification questions
What makes you say that?
What exactly does that mean?
How does this relate to what we have been talking about?
What is the nature of …?
What do we already know about this?
Can you give me an example?
Are you saying … or … ?
Can you rephrase that, please?
Probing assumptions
What else could we assume?
You seem to be assuming … ?
How did you choose those assumptions?
Please explain why/how … ?
How can you verify or disprove that assumption?
What would happen if … ?
Do you agree or disagree with … ?
Why is that happening?
How do you know this?
Show me … ?
Can you give me an example of that?
What do you think causes … ?
What is the nature of this?
Are these reasons good enough?
How can I be sure of what you are saying?
Why is … happening?
Why?
—————————————————
Principles of learner autonomy could be:(Frank Lacey)
Autonomy means moving the focus from teaching to learning.
Autonomy affords maximum possible influence to the learners.
Autonomy encourages and needs peer support and cooperation.
Autonomy means making use of self/peer assessment.
Autonomy requires and ensures 100% differentiation.
Autonomy can only be practised with student logbooks which are a documentation of learning and a tool of reflection.
The role of the teacher as supporting scaffolding and creating room for the development of autonomy is very demanding and very important.
Autonomy means empowering students, yet the classroom can be restrictive, so are the rules of chess or tennis, but the use of technology can take students outside of the structures of the classroom, and the students can take the outside world into the classroom.
Reflection Handouts
Click to access allin_turnock_extract.pdf
REFLECTION QUESTIONS
1. Reflect on your thinking, learning, and work today. What were you most proud of?
2. Where did you encounter struggle today, and what did you do to deal with it?
3. What about your thinking, learning, or work today brought you the most satisfaction? Why?
4. What is frustrating you? How do you plan to deal with that frustration?
5. What lessons were learned from failure today?
6. Where did you meet success, and who might benefit most from what you’ve learned along the way? How can you share this with them?
7. What are your next steps? Which of those steps will come easiest? Where will the terrain become rocky? What can you do now to navigate the road ahead with the most success?
8. What made you curious today?
9. How did I help you today? How did I hinder you? What can I do tomorrow to help you more?
10. How did you help the class today? How did you hinder the class today? What can you do tomorrow to help other learners more?
